Olivas Links #9
Olivas Links is a Forrest Richardson designed muni course in Ventura, CA that opened in 2008. Golf has been played here since the 1960s but due to its location between the Santa Clara River and Ventura Harbor, drainage issues caused Richardson to redesign the whole course when the city hired him in 2001. The result is an open, links-style course that feels ‘natural’ and fits in with its coastal plain surroundings. The course is about a mile from the ocean, and so wind is a constant. The course has large greens with openings at the front that allow golfers to play a variety of shots to the hole depending on pin placement and wind. Olivas is a great example of how good architects fit golf courses into their natural environments, both in beauty and playability.
The 9th hole is a mid-length par 4 at 344 from the blue tees. It shares a double green with the 18th hole, and has red-staked marshland on the right hand side. With the parking lot in the back, it’s certainly not the prettiest hole on the course, but it is one of the most strategic.
The Tee Shot
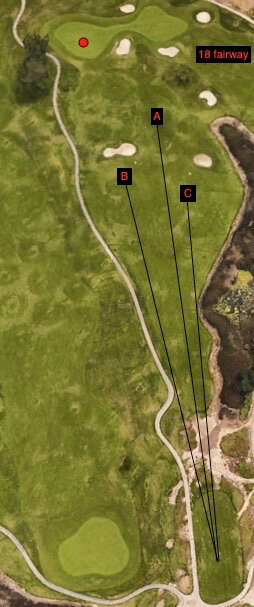
The left bunker is a ~255 carry off the tee. This is a long carry for most golfers from the blues, but the bunker narrows the fairway considerably to create risk/reward. The prevailing wind is from tee to green, off the ocean (tailwind). The right bunker is about 230 to reach off the tee.
Position A - split the bunkers with a drive of 260 or more, with only ~85 to the center. Most pin locations are easy to access from this distance, but it’s not ideal for front-right locations due to the slope of the right side of the green.
Position B - 225 to lay up to the left side of the fairway, which leaves 110 in. This is the most advantageous for right-side pin locations and for front center, since there’s a kick slope on the front right.
Position C - 210 lay up to the right side of the fairway. This brings the hazard more in play, but gives the golfer an advantage to access left side pin locations.
The Green

The primary feature is a steep drop off in the middle - the front sits on a plateau ~2 ft higher than the back, and is also a smaller surface.
D - Front-right location. There is a right-to-left left kick slope that makes this pin tough to access from the right side of the fairway (especially position C). Tee shots to B in the fairway are preferred (or left side of the fairway over the bunker if you can carry it!). A is advantageous because of the very short distance to the flag, but not as ideal of an angle as other pin locations.
E - Front-left location. Easiest to access from the right side of the fairway (position A or C), but left side of the fairway is ok because this area is flat and the ball feeds off the slope if you miss front-right on the approach shot.
F - Back-left location. Anything over the shelf in the middle will feed down to this location, but if you end up on the front of the green it’s a tricky two putt down the slope.
G - Back-right location. I am not sure if they ever put the pin up here, but it would be a fun and challenging spot. The connection area to the 18th green feeds balls down to this spot, and a back-left miss is ok as you’re putting uphill. Left side fairway locations are important to hit it close, unless your wedges are very dialed in.
In Summary
This hole is fun for golfers of all skill levels. Like many holes at Olivas, it uses width to create choices on how to attack the hole. The width also makes it playable in different wind speeds and directions. On a recent visit we had 20+ MPH Santa Ana winds directly in our face. The hole still played true to its strategic character even when the wind added 30+ yards. When the wind is howling in the other direction, carrying the bunkers becomes even more tempting and the green becomes more difficult to hold.
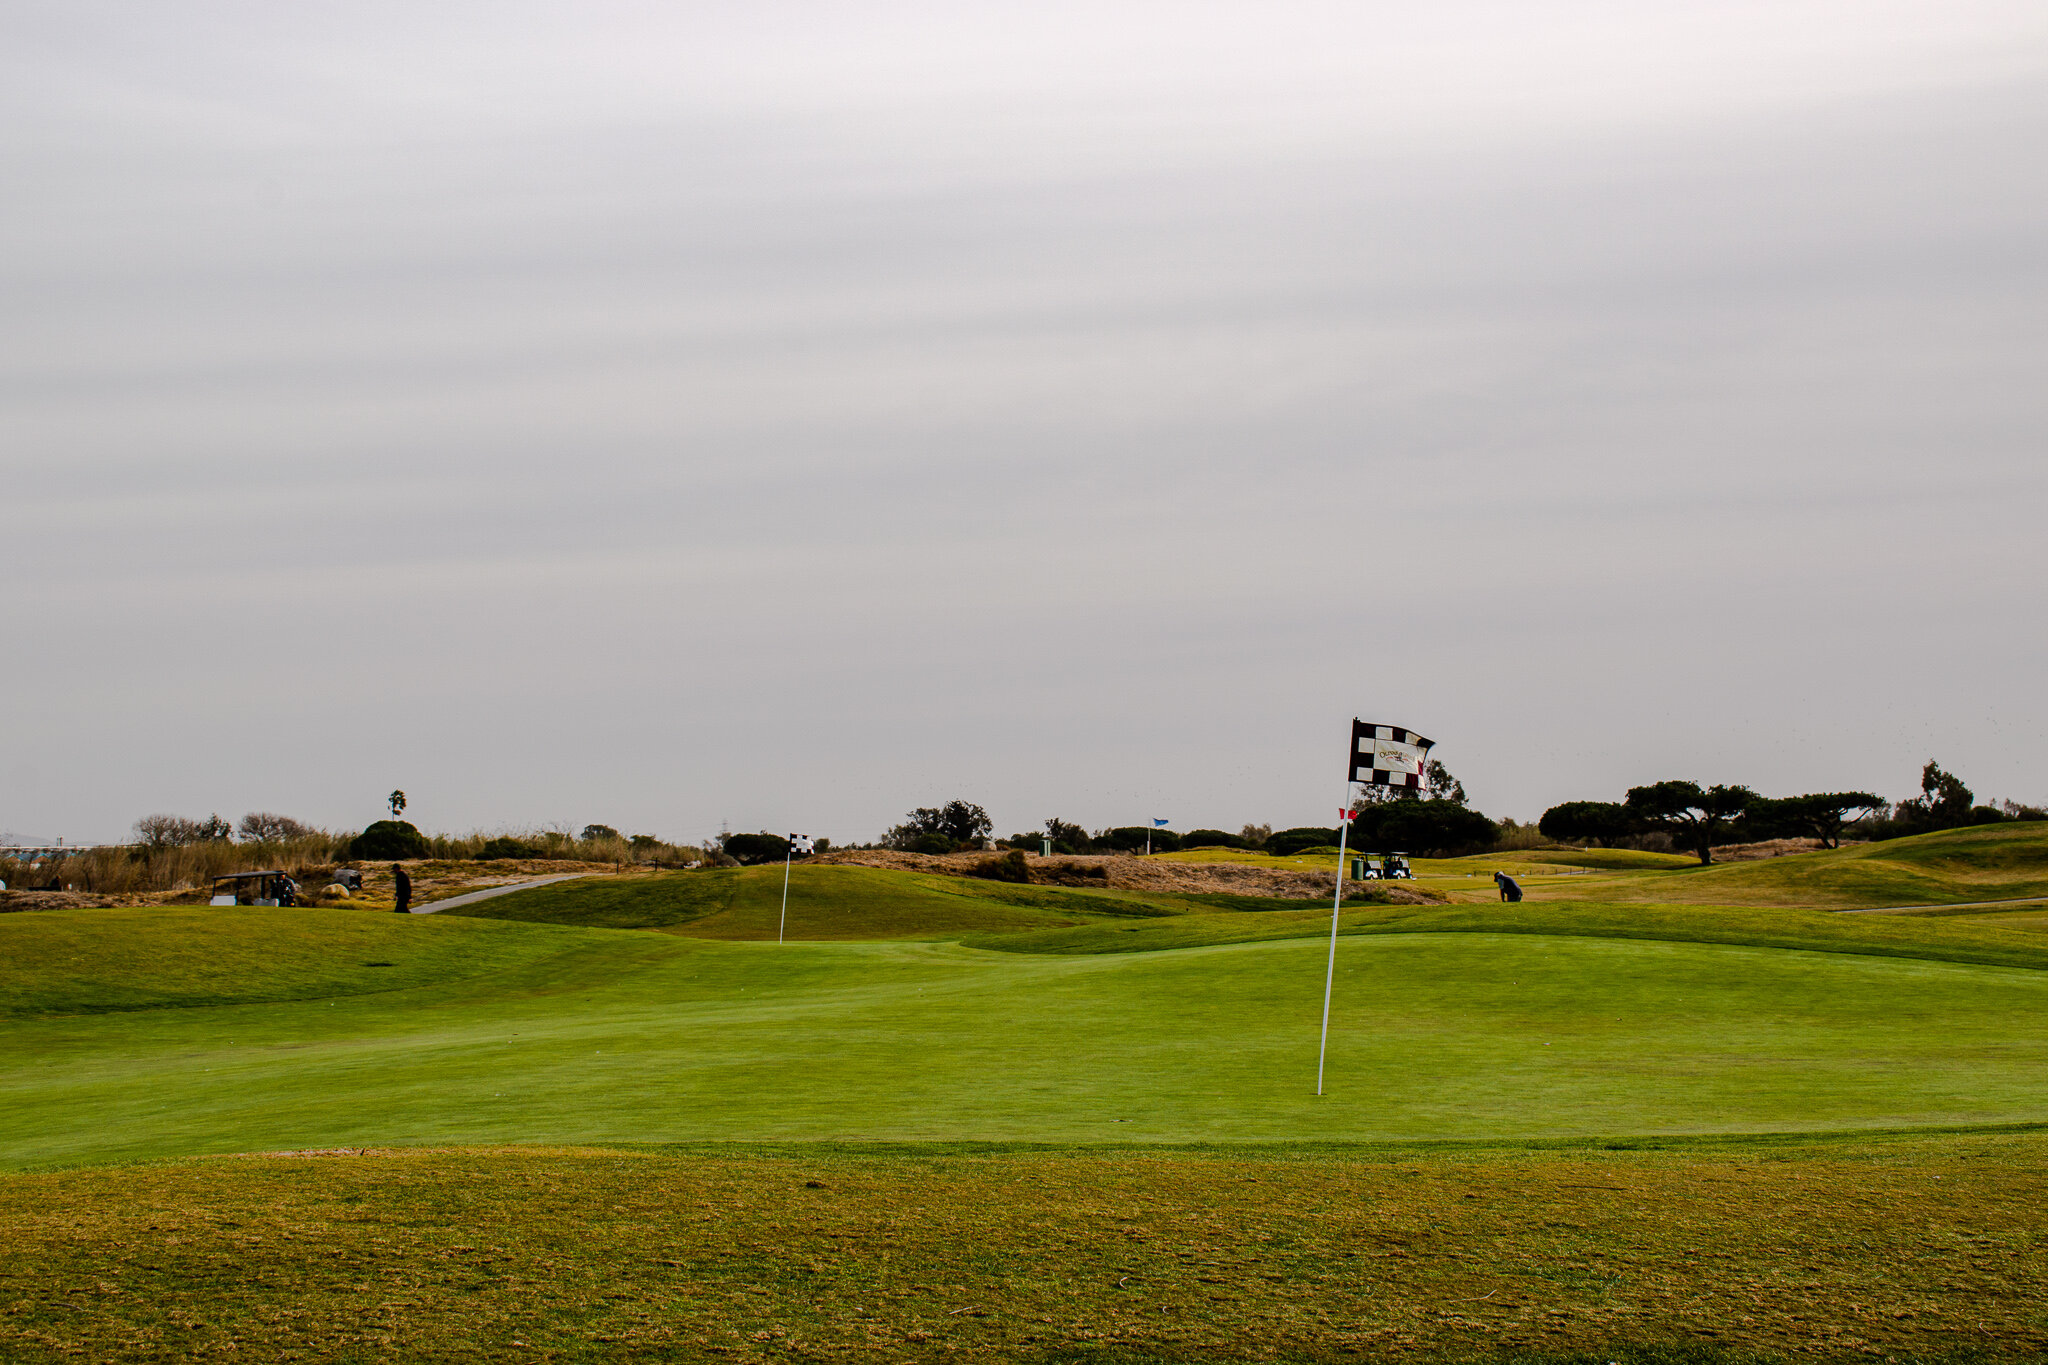
#9 green, with the #18 pin in the distance

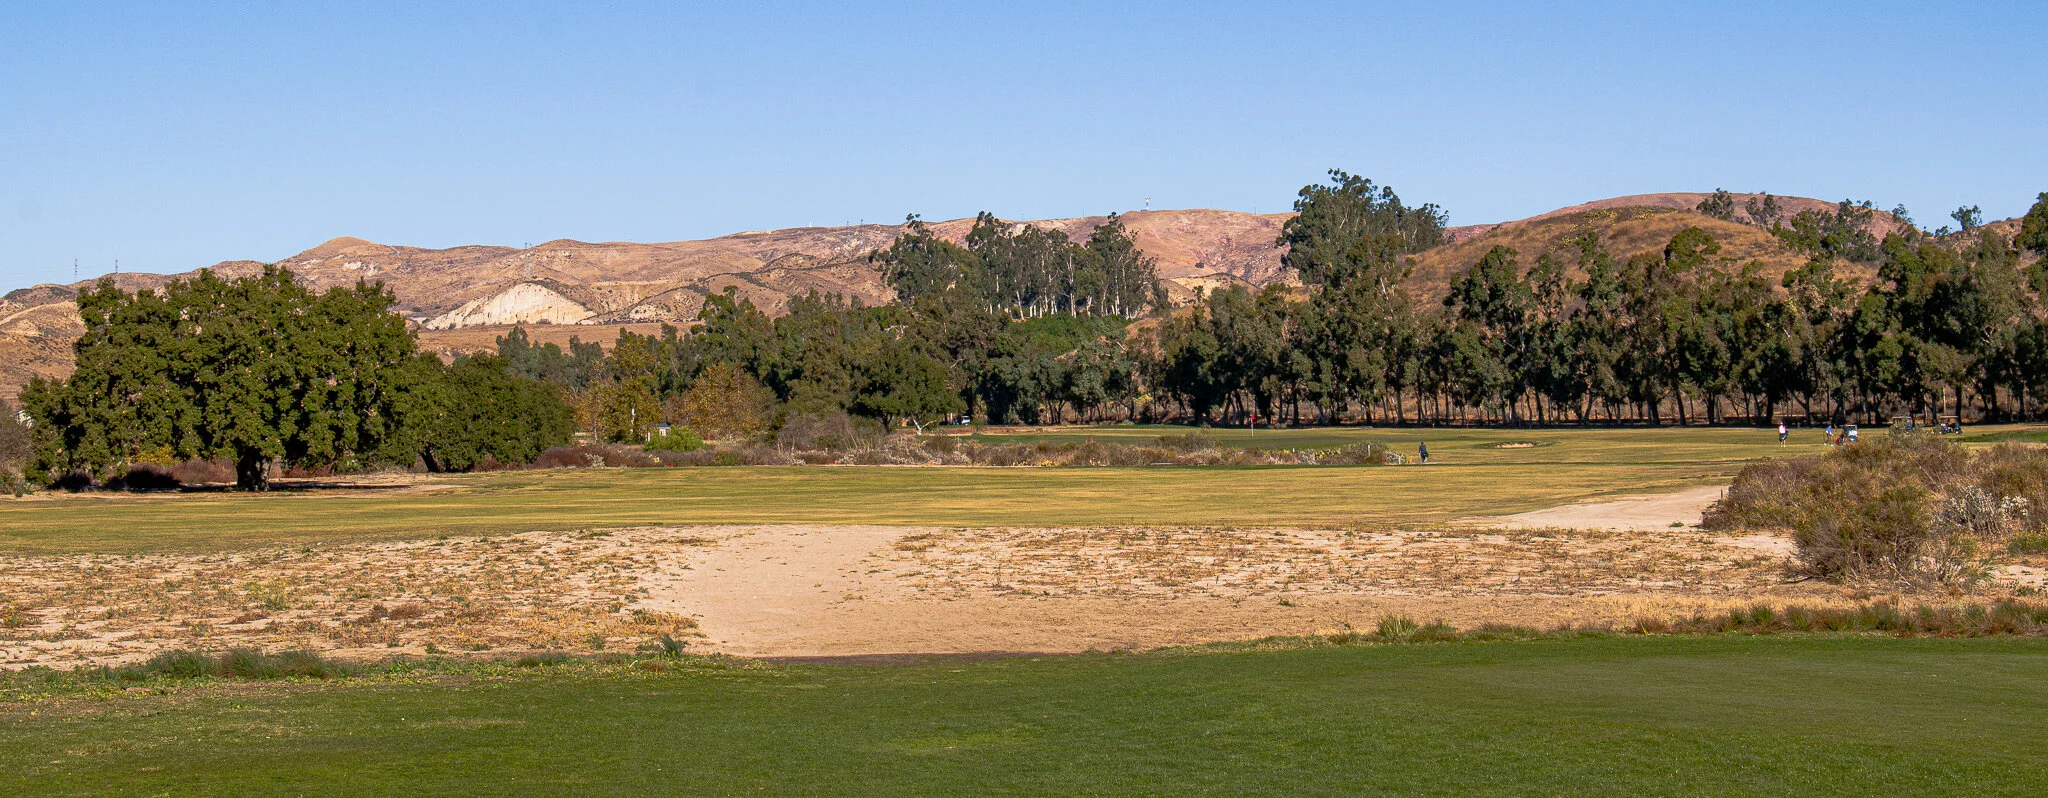
Approach from the left side of the fairway (Position B) - you can see how the raised front of the green makes this approach more difficult than from the right side of the fairway.
Fear the Double Dogleg - Spyglass Hill #14 vs. Rustic Canyon #5
December 24, 2020
It’s rare for Par 5s to be among the most challenging holes on a golf course. However, at Spyglass and Rustic Canyon, the use of a double dogleg changes that. Both holes dogleg right (left-to-right) on the first shot, and move right-to-left on the second. The result is a challenge and interest for all levels of golfer. For high handicappers, accuracy is at a premium. For low handicappers, you will probably have to work the ball both ways in order to score well.
Despite their similar shapes, both holes use the double dogleg in very different ways.
Spyglass Hill #14 - 525 yds from men’s tees (gold), Robert Trent Jones Sr.
Rustic Canyon #5 - 545 from the men’s tees (blue), Gil Hanse/Geoff Shackelford
The Tee Shot

Spyglass uses a lack of width at the corner of the first dogleg to challenge the golfer. Point B below (the shorter tee shot option) is at the narrowest part of the fairway, with trees encroaching on both sides of the rough (large trees on the left, smaller ones on the right). The more aggressive line (A) gives golfers a slightly wider fairway and a better angle to the green, but requires an accurate drive of 265 or more.

Rustic uses a waste area on the right side of the tee shot to give the golfer a decision about how much to cut off. A friend of mine has hit it in the waste area so many times that we’ve named it in his honor. The left side of the fairway gives golfers plenty of room to hit a conservative tee shot, but that makes the second and third shots even more challenging. There is a barranca at the end of the tee shot at 285 yards.
The Second Shot
Spyglass uses a water hazard, elevation change and a narrowing corridor to challenge the golfer. All three interplay with each other to create a nervy second shot whether you are laying up or going for it. The fairway slopes left to right and significantly downhill toward the water hazard. If you are too far left off the tee, this shot will end up being blind over the hill which creates additional challenge. After the initial downhill layup, the green is elevated substantially above the fairway. The genius of the second shot design is it puts even more pressure on you off the tee - the closer you are to the right side of the fairway, the better (past the small trees).
Rustic uses another waste area on the left side of the second shot, with a pot bunker narrowing the optimal approach angle on the other side. There are three ingenious features of this second shot:
The green (more detail in the next section) slopes right to left with a 6 ft drop off down to a collection area on the left side of the green. The optimal angle to hold it is from the line that takes on the most of the collection area.
There is actually a good amount of space between the waste area and the green, but because this plays uphill you can’t really see it. Carrying the waste area is visually intimidating, even if you’ve played the course a lot.
The bail out area is to the right of the pot bunker. That gives you a less than optimal angle on your third shot, however, given the green slope and the left-side drop off.
The Green
Spyglass allows for 3 distinct pin locations with different challenges.

Locations in the middle/front are the easiest but the back-to-front slope makes precision important. Too short and you’re flirting with the water or rolling back down the hill. Too long and you’re faced with a very difficult downhill bunker shot.
The ideal layup location for left pin placements is on the right side of the fairway, which brings the water very much into play with a downhill second shot.
The right side provides an obvious challenge with the water. RTJ built a slope from the middle of the green which allows you to land the ball middle-right and funnel it down to right side pin placements.
Rustic uses a large green (34 yards long) and a sizable apron (including the green, 61 yards long!) to create a variety of options and pin placements.

The primary feature golfers will notice is the ~6 ft drop off the left side of the green to the apron. This intimidates golfers on the 2nd/3rd shot, and often creates misses to the right side.
This is a problem because the green slopes right-to-left and back-to-front. The closer you are to the front, the more severe the right to left slope is, with a small drop off on the right side collar as well. If you miss to the right side collar (or bunker), it’s extremely hard to stop the ball on the next shot to a front or middle right-side pin. Any putt or chip shot hit too hard can run all the way off the left side and down to the collection area.
As is the case with all the greens at Rustic, there are a number of subtleties that are hard to capture without a green reading book.
In Summary
Both holes are a microcosm of how the architects think about design. RTJ courses tend to have more holes that fit into the ‘heroic’ school - requiring golfers to make forced carries over hazards in order to score well. That is a primary feature of #14. Why Spyglass is widely regarded as one of his best designs, however, is because there are a large number of strategic decisions that golfers must make along the way. #14 embodies that too - the hole is narrow but provides enough options for golfers to choose how aggressive they want to be on each shot, with appropriate rewards and penalties for each decision. Many other holes at Spyglass are very tough to par but have bail out or lay up areas that make them playable for higher handicappers. It’s a great example of a very challenging golf course that is not just ‘target golf.’
#5 at Rustic is a classic Hanse hole and embodies the strategic school of design. Golfers can choose their angles of attack on each shot, with a clear risk/reward for each. Every conservative shot on this hole makes a good score that much more difficult, while every aggressive shot can lead to a substantial advantage or a large number on the scorecard. The large, varied green creates a number of pin placements and the hole can play very differently from day to day. Like many at Rustic, it’s a fantastic match play hole.
If you want to learn more about schools of golf course design and golf course architecture, two of my favorite resources are thefriedegg.com and Geoff Shackelford’s book ‘Grounds for Golf.’
Tee Shot at Rustic #5 (usually blue tees are back a little further to the right)
Multiple Routes to the Hole - Sand Hollow (Championship) #2
December 14, 2020
Sand Hollow’s Championship Course is one of the most scenic in the US - you’ve probably seen photos of the cliff-side back 9, which boasts some of the best views in all of golf. What makes Sand Hollow a truly great golf course, in my opinion, is combining that scenery with great architecture to create an extremely fun, challenging layout. Architect John Fought used the open landscape of Southern Utah to create a links-style course where many of the holes give golfers multiple options on each shot. The greens are large and creatively designed as well. Today we will be highlighting the 2nd hole at Sand Hollow, a par-5 full of strategy.
Most par 5s generate interest on the 2nd shot - go for it, or lay up? But really good ones, like #2 at Sand Hollow, make the golfer think on the tee shot and the approach.
The Tee Shot
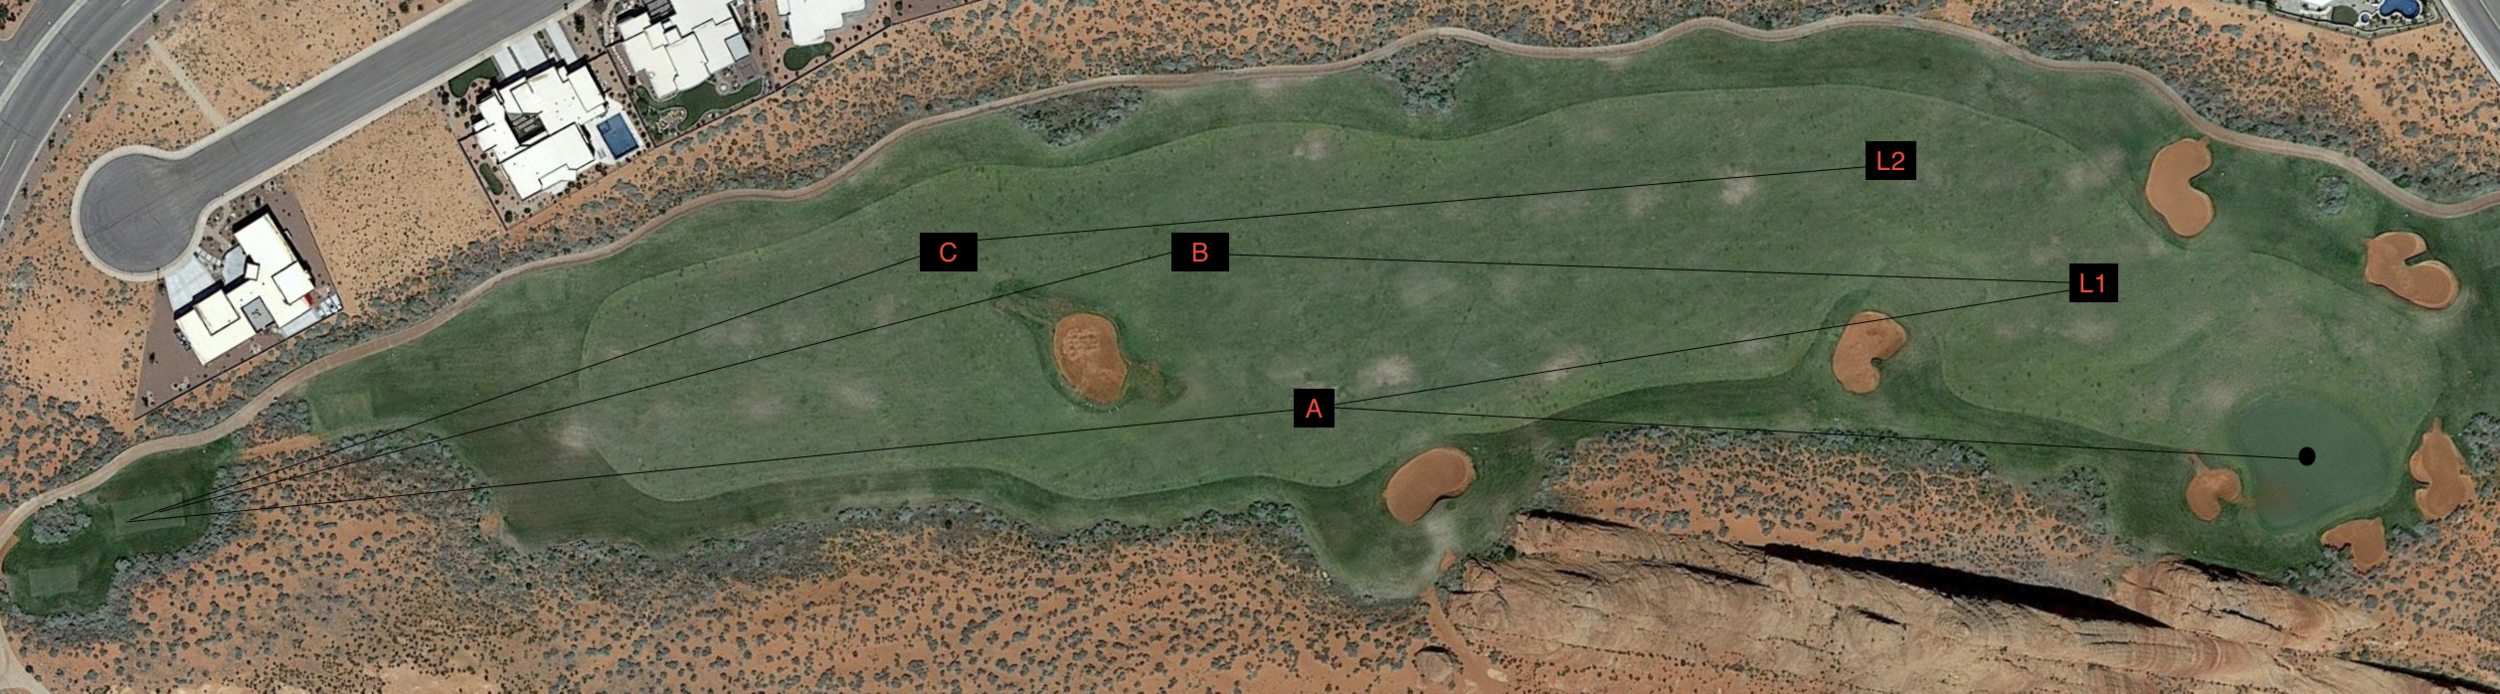
The first question - carry the middle bunker or go around it? From the blue tees it’s about a 240 carry. Sand Hollow is at 3,000 ft of elevation, so drives go ~10-20 yards further depending on your swing.
A (270-280 yds) - The best position to be in off the tee, and allows you to go for it in 2, with only 240 to the middle of the green from here. However, going even slightly right of this line brings the waste area, the large rock formation, and the right bunker into play.
B (250-260 yds) - You can avoid the centerline bunker via this line but still end up on the left side of the fairway. However, you are penalized for taking the safer line and going for it in 2 is difficult - from B it’s 280 to the center of the green. You do have an easier angle than A to the optimal layup point (L1).
C (210-220 yds) - A simple layup short of the bunker - gives you the option of a long iron off the tee and makes it playable for shorter hitters. L2 is about 240 from C.
The Approach
Going for it in 2 - The architect generated excellent risk/reward on this shot. High, soft, accurate shots are required to hold the narrow half of the green (right side facing from point A, closest to the rock). After the front bunker, there is a slope that can kick shots to the back bunker. This setup rewards players with very accurate ball striking while giving less confident players a bailout area left of the green.
Laying up - You can see that the closer your layup is, the more bunkers you need to take on. L2 is 100 yards from the center and L1 is 50 yards. The opening to the green on the left side (elevated, with a false front all the way around), allows golfers from L1 or who go for it and miss left to play a variety of shots for their third.
The Green
The two primary features that determine strategy are:
The narrow half of the green is elevated above the wide half, with a front to back slope off the front bunker.
There is a false front off most of the green that opens to the fairway (left side).
The combination of these two features creates an interesting choice for golfers off the tee:
If the pin is located in the narrow half of the green, the benefit of taking line A is lessened vs. B. You have more green to work with to feed the ball back to the pin on your 3rd shot if you bail out left, or lay up. If you go at the pin from A and leave it short or right, the chances of putting it close with your 3rd is low.
In Summary
The architect did a few things on this hole that I really enjoy in par 5s:
The wide fairway and angle of the hole create important risk/reward decisions on the tee shot. Many par 5s only focus on 2nd shot strategy after requiring a long, straight tee shot.
The features around the green described above play-in to your decision making all the way back to the tee.
The large fairway area left of the green combined with the false front create a number of options for golfers on their 3rd shot - anything from a highly lofted pitch to a bump and run or even an extra long putt.

Playing the hole backwards - Rustic Canyon #7
November 29, 2020
Our inaugural post highlights the strategic brilliance of Rustic Canyon’s 7th hole. Rustic is a Gil Hanse/Geoff Shackelford design about 45 minutes from LA, and one of the most architecturally interesting courses in the US. The large, undulating greens force you to change strategy from one day to the next, depending on pin placement and wind direction. Combined with wide, well-routed fairways, Rustic is the rare course that’s fun for high handicappers and challenging for low handicappers. It’s a great example of how pin placement determines strategy, not just for the approach shot but off the tee as well.
The 7th is medium-length par 4 at 340 from the men’s tees. The images below show three routes to the green and the three areas of the green. Another thing that’s special about this hole is the ability to choose your clubs depending on what you’re hitting well that day - you can take driver to 6 iron off the tee, and have anything from 7 iron to lob wedge in.
The Tee Shot

A is the most popular tee shot - laying up short of the wash with a long iron/hybrid. This gives you a ~130-160 yd semi-blind approach where it’s best to aim for the center of the green unless the pin is up front.
B gives you the obvious risk/reward - carry ~220-230 over the wash for a shorter 60-100 yard shot with a clear view of the green.
C is a shot that I didn’t discover until playing Rustic a few times. If the pin is back-right (or even back left if you’re feeling good about your wedges), you can hit a ~220-240 drive over here and have a wedge in to the deepest part of the green.
The Green

The predominant slope is back left to front right.
D is a back-left plateau.
E is a depression that runs down the middle of the green, splitting it in two.
F is the back-right plateau. There’s also a small elevated pin placement in the front right.
The rough and collar areas around the green fall off quickly. Almost anything on the collar will run 20 yards downhill.
The front left bunker (shown in the middle of the below diagram) is 8 ft tall and an extension of the wash.
Strategy
The severe slopes and hazards around the green force you to think about pin placement on your tee shot. Some preferred combinations are:
D section pin: Line B (carrying the hazard) is even more advantageous than other locations. With a wedge in your hand and playing into the primary green slope, you can choose how aggressive to be and make sure you are below the hole. As a secondary option, A and C present different challenges. For A - a short/mid iron in your hand and directly taking on the front bunker, but a better chance to stop the ball into the slope if you carry it. For C - a wedge in your hand but it’s very tough to stop the ball on the D plateau.
F section pin: Line C becomes more advantageous - ~100 yards into the fat part of the green isn’t too bad, just make sure you don’t go long! B is still good, but less advantageous on a relative basis than when the pin is in section D, unless you fade the ball.
E section pin: Not common but the pin was in this valley today at Rustic. This makes the risk/reward of each tee shot the most even of any pin location - B gives you an advantage, but C and A aren’t too hard since the ball will feed down into this area if you hit the middle of the green.
Front pin: The easiest location - takes line C out of play, as you can avoid the front bunker on lines A and B.
As you can see - a lot to think about on this hole! The gallery below is a collection of shots from today.

Tee Shot - pin is straight ahead

Approach A

Approach B

Approach C

Green from right side (pin is in position E, note the plateau D beyond the flag)

Front of green (pin is in position E)

Back of green (pin is in position E)
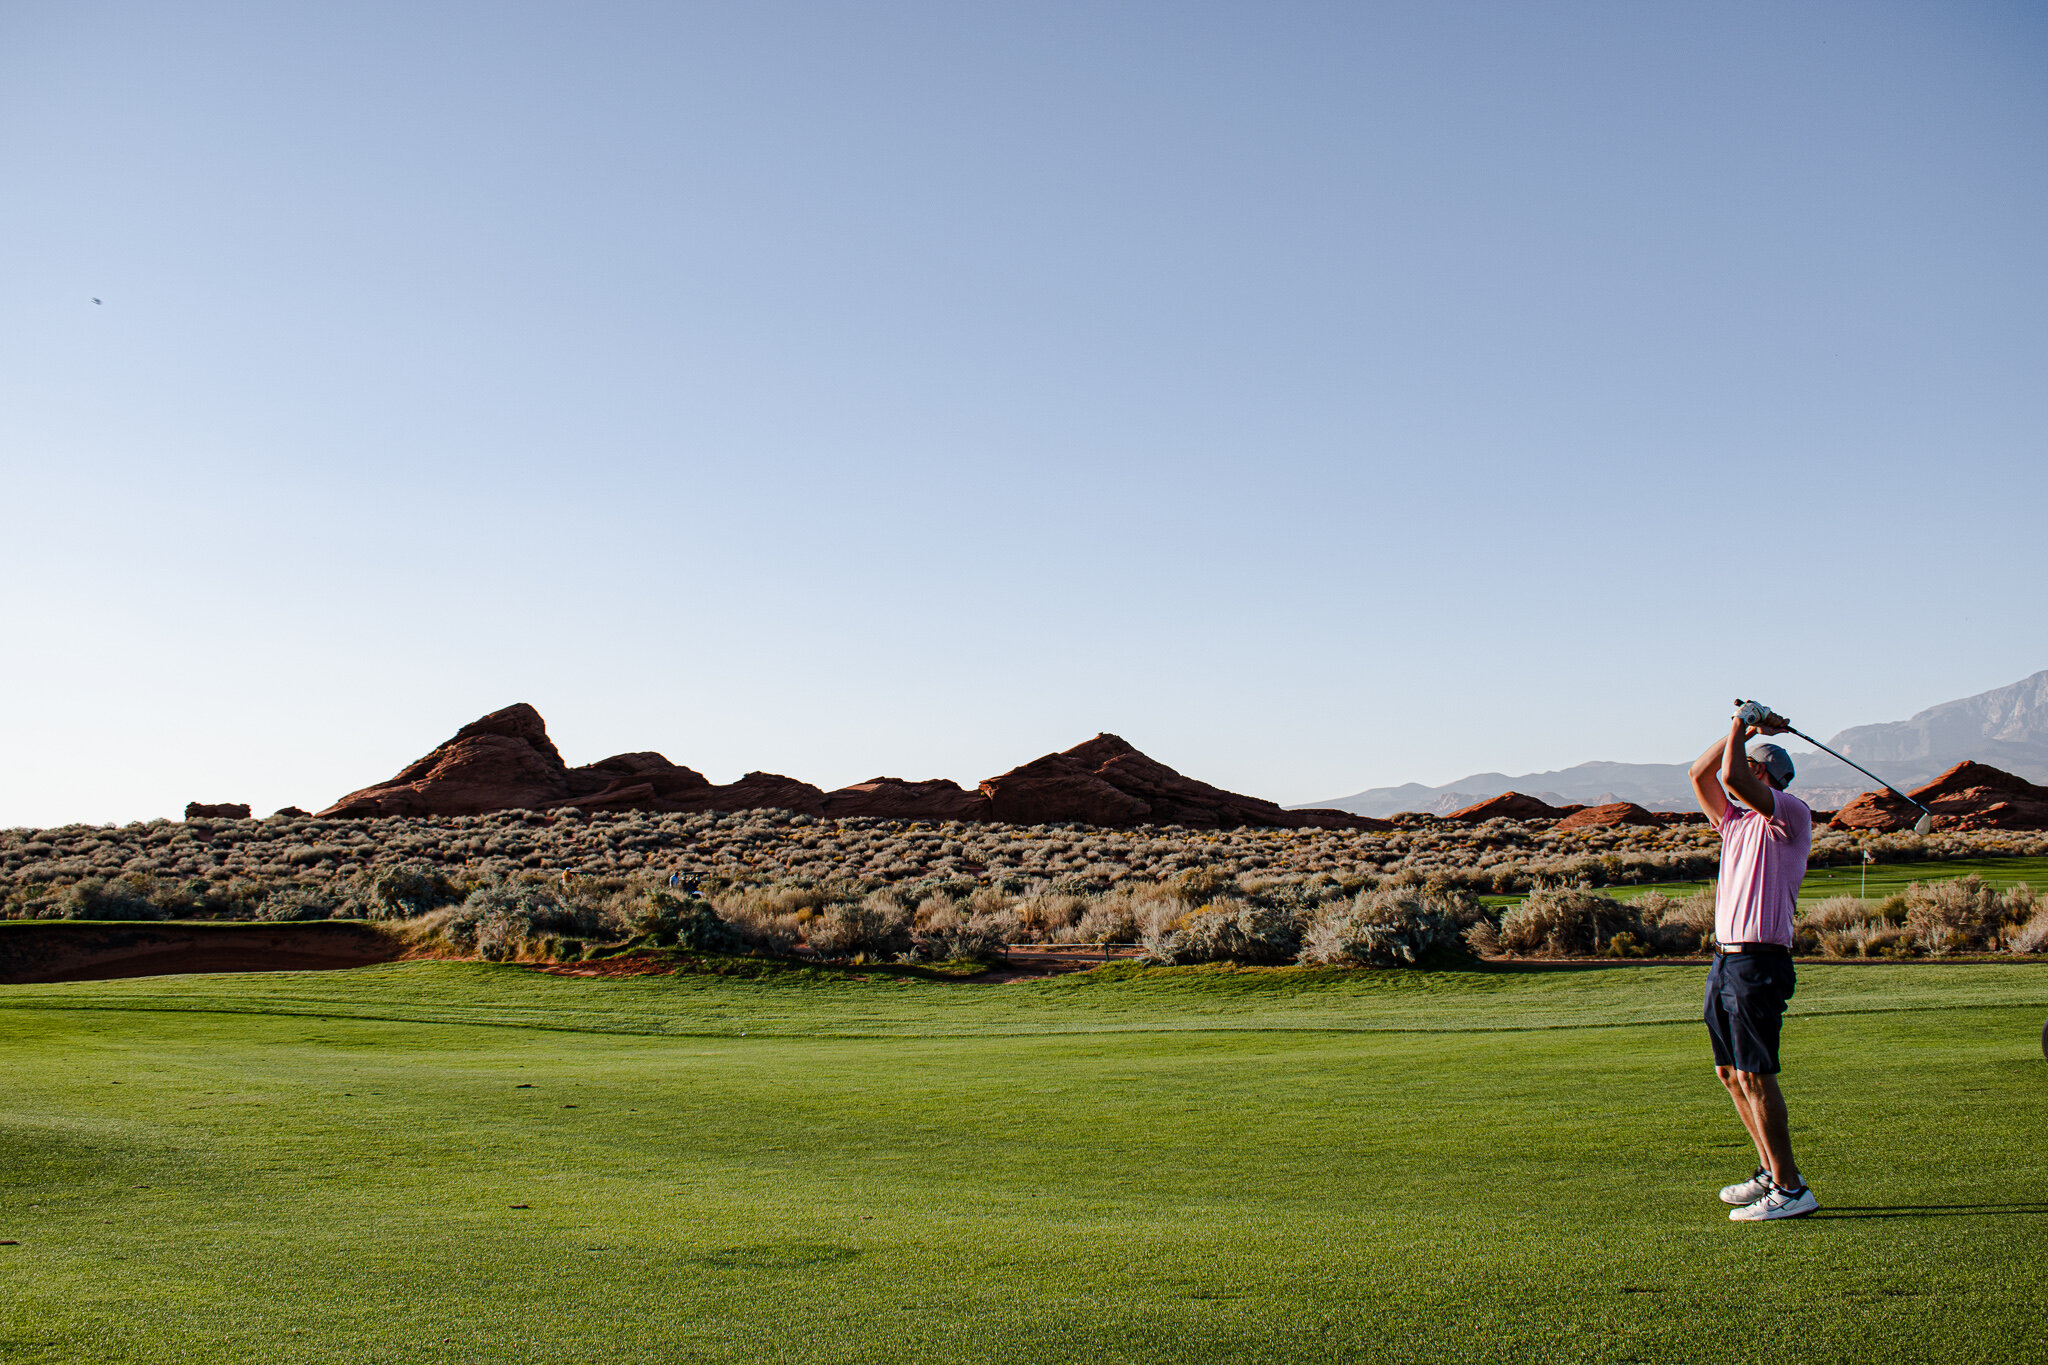
Gallery - Sand Hollow Championship Course
November 29, 2020
Quite possibly the most underrated course in the US. Holes 10-15 are spectacular, and the rest of the course is no slouch either - firm, fast, links-style with great greens. Somehow Sand Hollow isn’t on the Golf Digest Top 100 Public list!

Sand Hollow Championship Course #11 / #12

Sand Hollow Championship Course #15
Sand Hollow Championship Course - Front 9

Sand Hollow Championship Course - #10

Sand Hollow Championship Course - #13